Thursday, December 27, 2007

Working in a Workbook part II

Let’s start our continuous lesson.

Copying and moving worksheets: -

Suppose that you using a worksheet in a workbook and the same worksheet and data also required for another workbook, and then you have two choices that you create a new worksheet as it is or you can copy the worksheet from your previous workbook. I think the second option is much easier than first once, what you think?

To copy/move a sheet, in the same workbook; do this:

1) By your mouse select the sheet which you want to copy or move.

2) Now if you want to copy within the same workbook, press and hold down Ctrl key and drag the sheet tab to its new location. A copy of the sheet is formed in the new location with a logical name of new sheet tab.

3) How ever if you want to move the sheet within the original workbook drag the sheet tab to the location where you want to move the worksheet. Your sheet tab changed its position from old to new position.

Copy/move between workbooks; do this:

1) Open the both workbooks which are to be used.

2) Click on the Windows menu from the menu bar then select Arrange. Select desired arrangement, Example: - Tiled, etc.

3) To copy press and hold down the Ctrl key then select the sheet tab which you want to copy and dragging it to the new workbook in which place you want to copy it.

4) To move sheet between workbooks, Select the sheet tab and drag it to the new workbook to its new location.

For copy/move through menu command; does this: -

1) Open the both workbooks.

2) Activate the workbook from which you want to copy/move the sheets click the edit menu from the menu bar and then select Move or copy sheet…. a dialog box is appear.

3) Choose you choice.

4) From the To book: in drop down list select the name of the workbook where you want to move/copy the worksheet. If you want to move the sheet in a new workbook select new workbook.

5) In the before sheet: select the name of the sheet before which you want to insert the sheet.

6) Press the ok button

Note: - alternatively you move/copy your sheet by right click of your mouse over the sheet tab which you want for the same then select move from the shortcut menu.


Bookmark this post:


GoogleYahooMa.gnoliaTechnoratiFurlBlinklistDiggIt!Del.icio.us
SimpyRedditSpurl


Wednesday, December 26, 2007

Working in a Workbook Part I

Hi Friends how are you; I know that I am come back after a long time, I am extremely sorry for this incontinence.

Today I am ready for written about how to work with a work book.

Let start to use a workbook for manipulating data stored in various worksheets.

Moving between worksheets: -

Now I think all of you could understand about workbooks. Actually when you are open a excel file (example: - “.Xls”, “.CSV”, etc) that means you open a workbook which contain multiple sheets. In Excel you can open multiple workbooks so you must be known about how to move between worksheets easily. First thing which you must be known that for working with a work book you must be activate the Workbook.

To activate an opened workbook, do this:

1) From the menu bar select the window menu

2) Then from the list of opened window select the name which you want.

To activate a window by shortcut menu, do this:

1) Press the combination key of Ctrl + F6 and switch between open workbooks easily.

Inserting and Deleting Sheets: -

When you starting working with a workbook you will want to insert or remove sheets as per your requirement. Excel gives you a great flexibility to insert or remove sheets.

Inserting a sheet: -

You can insert a new sheet in the workbook at any location you desire.

To insert a sheet in to your work book, do this:

1) Activate the workbook you want to insert a sheet

2) Select the sheet before which you want to insert a sheet by clicking its sheet tab

3) Click on the insert menu and choose the Worksheet.

To insert a sheet in to your workbook by shortcut key, do this:

1) Activate the workbook by pressing the key combination of Ctrl + F6

2) Then by pressing Ctrl +PgDn or Ctrl + PgUp select the sheet tab before which you want to insert the sheet

3) Then press Shift + F11 to insert a sheet.

Deleting a sheet: -

To delete a sheet from a workbook; do this:

1) Select the sheet you want to delete

2) Click the Edit menu then choose Delete Sheet from it.

Another option is take the mouse pointer on the sheet tab which sheet you want to delete click the right mouse button and then choose delete.

Change the number of sheet in new workbooks:

To change the no of sheet in new workbooks; do this:

1) Click Tools menu then choose Options. A new dialog box is opened which is called option dialog box.

2) Select the option tab from this.

3) Select the Sheets in a workbook: and choose the number of sheets in a workbook.

4) After you set the number of sheets then press OK button.

Note: - A workbook contains 3 sheets in default


AddThis Social Bookmark Button

Saturday, December 15, 2007

The Bars of the Window part II

So friend let continue our last session. In our last post we are know about Title bar and some imp window’s element today we are continued with imp window’s element

Active workbook window: - Active workbook window is which accepts entries and commands; means you can edit create or enter data on it.

Inactive workbook window: - Inactive window is such type of window which contains Excel information but you can not affect it by commands. Inactive workbook window has a gray title bar and this window always in the behind of active workbook window.

Workbook bar: - When you minimize a workbook window within the Excel application window then this bar is called a Workbook bar.

Workbook control icon: - As same like application control icon, the workbook control icon helps you to manipulate the active workbook window. You can show it on the top right edge of the workbook window.

Status bar: - It is shown on the bottom of the window it tells your current status on Excel window means what Excel is starting too prepared for you.

Formula bar: - The formula bar is shown on below the tool bar or menu bar. In the formula bar you can enter numbers or formula.
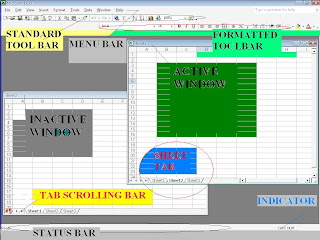
Menu bar: -

The menu bar is located on the just below of the title bar. It is the most important bar of the window because it contains all the commands which used in Excel to operate Excel. Main features of menu bar are briefly described.

File menu (Alt + F): - This menu contains all the command related to operate file systems

Example: - New (Ctrl + N), Open (Ctrl + O), Close (Ctrl +W),

Save (Ctrl +S), Save As, Print (Ctrl +P), recently open document,

Exit (Alt + F4)

Edit menu: - Edit menu contains the all commands for editing a workbook document.

Example: - Copy, Delete, Move, Cut, Delete sheet, etc

View menu: - This menu contains commands related to controlling the view of workbook document. Example: - Normal, Zoom, Task pane, etc

Insert menu: - Insert menu contains commands related to insert cell, column, row, picture, etc. Example: - Cells, Rows, Columns, etc.

Format menu: - Commands related to formatting a document such as Cells, Row, Sheet, Columns, etc.

Tools menu: - This is the most important menu in the menu bar which contains all the commands related to protect a workbook, protect spreadsheets, option, etc

Data menu: - Data menu related to commands database function. Example: - Sort, Filter, Validation, etc.

Window menu: - This menu contains command related to working within the window. Example: - Hide Freeze panes, etc

Help menu: - Help menu contains commands related to Microsoft Excel Help topic, about Microsoft Office, etc

Note: - In some version of Excel the pull down menu opens is two steps, when you first open the menu it open with contains mostly used commands and arrow in the menu shows click on the pull down arrow then you can shows the all commands in a menu.

Tool bars: -

The tool bar is a helpful wizard to work with Excel fast. The toolbar contains all the important commands which is most commonly used for operate a command.

You can look the tool bars in below of the menu bar. There are two types of toolbar

1) Standard Tool bar

2) Formatted Tool bar

You can adjust the tool bars as your use. Which make the Excel is a popular and flexible program. From the view menu you can adjust the view of tool bar.

Scroll Bar: -

As the name of the bar the scroll bar is used for scrolling the workbook document. The scroll bar which is appears at the left of the Excel workbook window it is called the vertical scroll bar. And the bar which is appears on the bottom of the window is called the horizontal scrolling bar. Due to the large size of document of your workbook the scroll bar is required for scrolling your document by which you get the best view of your document.

Split Bar: -

As the name of the bar it is use for splitting some thing, correct it is used for splitting your workbook document in horizontal or vertical style as your requirement. You can choose an active cell from where you want to split your document and select Split from Window menu. The split bar is also located in the top of the vertical scroll bar and to the right of the horizontal scroll bar. By double clicking a split bar you also can manage the view of your workbook document. Again for removing split you can do this go to window menu and select remove split, or can be double click on the split bar.

Sheet Tab:-

In the bottom of a work book window a icon u see which contain sheet name.

Ex: - Sheet 1, Sheet 2…..

Through this tab u can jump one Sheet to another Sheet.

Tab scrolling buttons: -

These are the arrow buttons which is present in the left of the sheet tabs. To scroll between Sheet tabs click an arrow for the direction you want to scroll.

Shortcut Menu:-

Shortcut menu are meant to display frequently use commands.

To display shortcut menu you click the right button of the mouse or press & hold down the Shift key then F10 key (Shift +F10). To remove it u can Press esc key on your keyboard.

So friend now we are finished this session now another day we are come with a exciting lesson.

Thursday, December 13, 2007

The Bars of the Window part I

Hi friends how are you. Please pay attention because our topic is Bars. I know that you get excited very much due to the topic. Yes today we are known about the all bars which are normally used in windows. This is the reason why I am given name of today’s topic is “The Bars of the Window”

Let start about knowing how many bars are used in window, and what is the uses of those bar. We are using Excel for describe the bars.

Title Bar: - At the top of an Excel window you can look a bar which is called title bar.

On the left edge of the title bar you look an icon by click on this icon you look a control menu is open, due to which the icon is called application control menu box.

Next to the application control menu box you look the name of the open document is displayed. Example: - Microsoft Excel - My Work.

On the right edge of the title bar three buttons are displayed which are minimize, restore/maximize and close button respectively.

Note: - By double clicking the title bar you can restore/ maximize an Excel window.

Now here is the some important description you should be known about this.

Application Window: - Excel runs in which window this is called Application Window.

Application Icon: - When you open a excel window you also show it on the task bar (I think all of my reader are knows about task bar so why I am not interested to describe task bar.), the task bar button of an application window is called application icon.

Application control icon: - The menu which gives you permission to manipulate the application window.

Mouse Pointer: - The arrow on the screen arrow which is move with your movement of mouse. Mouse pointer is become changed in different condition of work in excel.

Document window: - In which window the Excel Workbook is displayed is called Document window.

Workbook window: - A window within the Excel application window in which a worksheet, dialog box or chart is displayed.

Introduction with the Bars of the window is not complete so I am also discussing about the same topic. Continue……………………..

Book mark this post:-

Add to Google Reader or Homepage

Infotiger


Tuesday, December 11, 2007

Quitting from Excel


Friends today we are learn about how to quitting from an Excel window.

To quitting from excel, follow the following steps

1) Click the File menu and choose Exit
Shortcut key for closing a excel window is hold down the Alt button and press F4 (Alt + F4)

Alternative methods for closing an Excel window

1) Click the close button in the top right corner
2) double click the control icon at the left of the title bar


Note: - When all work sheets are closed, then closed excel window. This habit improve your accuracy level

This are the basic things about excel which is required to know about excel before we discuss about the deeply knowledge. Now tomorrow we are starting to discuss about the tool bar and its function in excel. Shortly we also published general shortcut key which help to improve speed.


If you like this post link it with

Subscribe in a reader

Add to Google Reader or Homepage

Monday, December 10, 2007

Open a Workbook


Open a Workbook in Microsoft Excel.

For opening a existing excel workbook, do the following steps.

1) Click on File menu and Open
2) A open dialog box is appeared
3) From the look in: box specify the correct location of your file
4) In the File name box specify your file name. or select your file from the correct location.
5) In the file type box you can select your file type
6) Press the ok button.

Then you look the desired workbook is opened in the Excel window

Shortcut Key for opening a workbook is "Ctrl + O"

Friends every time I am said to you that my main aim is Share my knowledge with you, I am also invites my readers that please Came and help us with your best knowledge.
I am appreciate all of my readers .
so kindly post your comments in regularly basis.

You must be followed our following posts because all of those posts are related to each other.

1) Getting started with Excel.

2) Creating a Workbook.

3) Saving a workbook.

4) Closing a workbook.

Closing a Workbook Window


After finishing your work in worksheet you need to close this workbook.

We prefer before closing a Excel workbook don’t forgot to save your work.

If you not do this and make some changes since last saved then before closing a workbook Excel displays an alert box asking whether you want to save your work before closing.

To close a Workbook: Follow these Steps

1) Click the File menu and choose Close. Shortcut Key for close a workbook is

(Ctrl + W.)

Alternative method for closing a workbook Click the closed button on the right edge.

If the workbook closed it means no changes have been made the work book since it was saved last.

2) If you have made some changes to the workbook since the last save and forget to save it. The alert dialog box appears. In the alert dialog box Excel asked to you that, do you want to save changes you made since after last saved.

The alert dialog box gives you three choices. The choices are following.

1) Yes: - If you click on yes button excel save all your work in the existing Workbook

Note: - In some version of excel you look after clicking yes a save as dialog box appears, now you can saved your file as a different name or overwrite the existing file.

2) No: - If you click on No button Excel ignore all of your changes since last saved and close the work book

3) Cancel: - If you click on cancel button Excel cancel the closed command.

Note: - You can used the cancel button if you think forget to save your work and little confused that you do the correct thing or not


You must be followed our following posts because all of those posts are related to each other.

1) Getting started with Excel.

1) Creating a Workbook

2) Saving a workbook.

3) Open a workbook.

Saving a Workbook


So friend I am back after a long time.

Today we are learning about saving a work book.

It is a good habit if you save your imp work in regularly bases.

For saving workbook Excel has two commands. The commands are following

1) Save

2) Save As

1) Save: - Save command used to save an existing workbook. Suppose your book name is “My work” then if you do some changes on this workbook and want to save your changes in the same book you can do this by save command.

2) Save As: - This command is used for save an existing workbook under a new name.

Let save our workbook for the first time; Follow these steps

1) Click the File menu and choose Save As. A dialog box appears which is called Save As.

2) In the top of the dialog box you look save in box. Here you specify the location where you want to save the file.

3) In the file name: box gives the name of the file. Example: “My work

4) In the save as type: box give the type of the file. By default select “Microsoft Excel Workbook”. And about the other file types we discuss later.

5) At last click on the ok command button. You look the work book is saved by the name you give.

Now try this in your own Computer.

You must be followed our following posts because all of those posts are related to each other.

1) Getting started with Excel.

2) Creating a Workbook

3) Closing a workbook.

4) Open a workbook.

Monday, December 3, 2007

Creating a Workbook

In our post Introduction of spreadsheets we are understand about Spreadsheets

(Worksheets). Now we are know about workbook.


A Workbook can contain many worksheets as per your requirement.

Now for creating a new work book follow the steps

1) Select File menu

2) Choose New

The new dialog box is appeared.

From the General tab, select Blank workbook

Click on the OK button to open a new blank workbook.


If you want to create a sample workbook which is inbuilt with Microsoft Office Excel

Then follow the following steps

1) Go to file menu and select new, a New dialog box displayed

2) Select the Spreadsheet Solutions tab in the dialog box, which displayed all the sample workbooks.

3) Select the sample which you want and click on the OK button.

The desired workbook is created and ready to use.


You must be followed our following posts because all of those posts are related to each other.

1) Getting started with Excel.

2) Saving a workbook.

3) Closing a workbook.

4) Open a workbook.

Getting started with Excel.

So friends let us know how to Getting started with Excel.

Before starting I think all of our readers install Microsoft Office on there computer. It is not matter which version of Microsoft Office you have, but we recommended Microsoft Office XP.

First procedure for starting MS EXCEL (Microsoft Excel) is following

1) Click the start button

2) Choose Programs

3) Click on Microsoft Excel


Another procedure is

1) Click the start button

2) Click on run command

3) Type Excel and press enter.

After clicking you look an Excel window is displayed.


You must be followed our following posts because all of those posts are related to each other.

1) Create a workbook.

2) Saving a workbook.

3) Closing a work book.

4) Open a workbook

Sunday, December 2, 2007

Introduction of Spreadsheets


We are ready to wright our Second post.

Today We are Know Spreadsheets. First Question is our mind is What is Spreadsheet?

In a Definition we can say ; Spreadsheet is a Electronic tool that can Calculate, Manipulate & Analyze Set of numbers.

Electronic Spreadsheet are widely use for making Reports, Graphs, Charts etc. Spreadsheet also called a Work sheet.

A worksheet is a Combination of Rows and Columns . The Intersection of Rows and Columns is called Cell.

A Cell can hold a number of text strings Formula. A worksheet contain 256 columns like (a b c ...) and 65536 Rows as (1 2 3 ....)

Now u thinks how many Cells are contain in a Worksheet , so the answer is simple (number of row x number of columns) 655536*256 = 16777216

Now a Question is in your mind how we go to Particulars Cells. Suppose I want to go in A1 cell,

that means the cell which intersects between column A, Row 1. As is it if we want to go B3 it means 3rd row in B columns.


Now we are Completely Understand the Meaning of Spreadsheet(Worksheet).


Our next topic which we discus about getting starting with Excel


Kindly post your Comment which help us to make our post better.

Saturday, December 1, 2007

Introduction of Excel


Before We are learning Excel or Understanding the concepts of Spreadsheets, we must be know the need of a Powerful program like Excel.


Today Excel become a more popular program in commercial field's.

1.Excel is more popular due to combination of row and columns

2.More powerful in critical calculation's.

3. powerful in maintains commercial database.

At last not least it's more easy to use than other program.

In a look we can say that a Excel spreadsheet can use it's spreadsheet data to store your details in a matrix of rows and columns, so that it can be used later .

Notes : Kindly post's your comments about this post.

Subscribe Now: From your browser

Search:

Learn Office Excel